8.15.2011

Black Bean Salsa with Cucumber and Mango


I had cooked some fresh black beans that I bought at the Farmers Market, and threw together this recipe.  It's a combo variation of two of my summer favorites: black bean & corn salad, and mango & cucumber salsa.

Recipe:

1 mango, seeded & diced
1 cucumber, seeded & diced

1/3 cup red onion, diced
1 jalepeno, seeded & diced

1 tsp. cumin
1-2 tsp. Tabasco sauce (to taste)

1-1/2 cups cooked or canned black beans
1 lime, juiced
1/4 cup cilantro (optional)

1) Mix together the "cool" ingredients - the mango & cucumber.

2) In another bowl, mix together the "hot" ingredients - the onion, jalepeno, cumin, and hot sauce.  You can adjust the amounts to your taste and your tolerance for "hot."


3) Mix the "cool" and "hot" ingredients together, then add the black beans, lime juice, and cilantro.
Is it a salad or is it a salsa?  In our house we use it as both.  You can eat it on its own, as dip for corn chips, or roll it up in a tortilla.  The cool and spicy tastes together in one dish really complement each other.  Like many spicy dishes, this is one that tastes better after a day in the refrigerator, so the flavors have time to meld.

Besides tasting great, this is a very attractive & colorful dish.  In fact, all the colors were not exactly what I planned.  My cooked black beans turned an unexpected and elegant shade of purple.  And the jalapenos from my garden were turning red, which gave the salsa even more of a rainbow look.


Bean Facts of Life: Where do beans come from?

Obvious answer, right?  Beans come from plants.

But how often do you actually see shelled beans (black beans, chick peas, navy beans etc.) in fresh form?  Chances are, if you cook with beans, you're using either canned or dried.  So when I saw a sign saying "black beans" at the Farmers Market, I was intrigued.  I bought about a pound and a half, and then tried to figure out what to do with them.


First of all, how long do you cook them?  Dried beans take hours to cook - you have to soak them for several hours, then at least another hour of cooking time.  Logically, fresh beans wouldn't need as much time because they haven't lost their moisture.  Sure enough, that's the case.  I found cooking directions by googling "shell beans".  You shell the beans (open the pods & take the beans out), and boil the beans in water for about 45-60 minutes, and they're ready to use in any recipe that calls for cooked beans.

So I started to shell the beans.  The pods weren't all that attractive, but inside were beautiful little black beans...

...that took an awfully long time to shell.  About 20 minutes later, I had 1-1/2 cups of black beans, which I put into a pot of water on the stove.  I tested them after 40 minutes, then kept them in for another 10 (50 minutes total).  Interestingly enough, the beans had turned purple during cooking.


The beans were tender and flavorful, but frankly, I couldn't tell the difference between these and cooking beans that started off dried. They cooked in less overall time, but I'm not sure the savings was worth the time spent shelling them.  I did save some of the uncooked beans to plant in my garden next spring - dried beans might be pretty cheap, but if I can grow black beans myself, for free, it would be worth the time spent shelling them.

8.02.2011

Local Garlic


I love cooking with garlic - in stir-frys, salads, soups, sauces, pastas, you name it.  My family spreads roasted garlic on bread, and one day, I'm going to try out some of the chocolate-garlic recipes I have in my garlic cookbooks.  But it bothers me that most garlic in stores is from China.  That's right - China grows about 75% of the garlic sold in the U.S.

I'm not strongly on the locavore bandwagon - I support the idea in general, but the issues of where and how food is produced are more complex than just the country listed on the label.  There's also the issue of cost - in an ideal world, I'd buy local and shun internationally transported foods, but I need to be able to afford to eat.

But garlic... why on earth does that need to be imported?  It's not like buying peaches in January - it's a basic root crop, that can be grown in a variety of climates, and stored for a pretty long time. I might be willing to increase my carbon footprint for a persimmon or mango, but not for something as ubiquitous as garlic. So when I was at the local farmer's market, I decided to seek out some locally grown, organic garlic.

There was some sticker shock - the best deal I could find was 6 heads for $5, which was at least twice what I'd pay at the grocery store. Was it worth it? You bet. Besides the satisfaction of supporting regional small farms and not having used 7000 miles of fossil fuels to transport it from the other side of the planet, this was excellent quality garlic! The cloves separated easily and the peel fell right off to reveal perfect, smooth cloves.  I might not be ready to give up bananas or mangoes, but I can do my part and buy local garlic.

My Favorite Tofu Stir Fry

The first garden eggplant was ready to be picked, so I decided to make my favorite tofu stir fry.

My favorite tofu stir fry isn't my family's favorite tofu stir fry though.  The Picky Eater likes tofu, but without vegetables.  Even The Adventurous Eater doesn't particularly like eggplant and mushrooms, especially in large pieces.  So this stir fry is technically two stir frys, so that the tofu and veggies stay separate and uncorrupted.


The recipe is pretty simple, and doesn't really need exact measurements  - use the vegetables you have and the spices you like, in the amounts that suit you.  Besides the eggplant from the garden, I also had some shitake mushrooms in the refrigerator.  Basil from the garden, and garlic from the farmer's market (more about that here) finished off the dish.  If I had planned ahead I would have grated fresh ginger, but I didn't so I used ginger powder from my spice cabinet.

Recipe
(quantities approximate)
2 lbs. firm tofu
2 small japanese eggplants (these are the skinny ones - sometimes called chinese eggplants)
1/2 pound shitake mushrooms
handful of basil leaves
4-5 garlic cloves
2-4 tbsp. olive oil
3 tbsp. tamari* (or regular soy sauce)
white pepper & ginger to taste

1) Cut the tofu into cubes.  Slice the mushrooms and eggplant thinly, chop the basil, mince or press the garlic.

2) Put two large saute or stir-fry pans on the stove, heat some of the oil in each pan. When the oil is hot, add half the garlic to each pan and stir fry for about a minute.

3) Add the tofu to one pan, and add the eggplants and mushrooms to the other. Stir fry.

This is where it gets a little complicated, since you have to do two things at once.


4) Once the tofu has cooked for about a minute, add the tamari, ginger, and white pepper (I used about a teaspoon of each spice, but it really depends on your taste).  Keep stir frying for about 4 minutes.  When you cut open a cube of tofu, it should be an even tan color.

5) Meanwhile, keep stir frying the eggplant-mushrooms in the other pan, until the eggplant looks almost completely tender (around 7-8 minutes).  Add the basil and stir fry for another minute.

I usually serve this with brown rice.  Other vegetables on the side work well too.


 *A note about tamari - I use tamari both because I like the strong taste, and because unlike a lot of things labeled "soy sauce", tamari is just soy, without added ingredients. I like the "San-J" brand - it's reduced sodium, and O-U kosher.


8.01.2011

Shitake Mushrooms, Roasted Red Peppers, Chick Peas & Basil

It's hot.
Really hot.
Too hot to cook.

But, in the midst of this hot weather, I had to bring a side dish to a potluck dinner. So, I needed an attractive side dish that wouldn't require a whole lot of cooking.  Luckily, even though I don't like hot weather, the basil in my garden does. I trimmed a few stalks from one of the basil plants, and searched through my kitchen for what might go well with it.

Recipe

1 tbsp. olive oil
1 lb. shitake mushrooms
2  12oz. jars roasted red peppers, drained & chopped
2 cups cooked or canned chick peas
2 cloves garlic
2 tbsp. balsamic vinegar
Basil or arugula, or a mix

1) Slice the shitake mushrooms and sautee them in olive oil for 3-4 minutes until tender. (I also added some chopped oregano).  They'll reduce very quickly.

2) Mix the mushrooms, red peppers, chick peas, and balsamic vinegar, and add pepper to taste.


3) Now the dilemma - should I tear the basil into small pieces and mix it in with the vegetables, or serve the vegetables on a bed of basil?  I went for the bed of basil:


Easy, colorful, and I only had to have the stove on for a couple of minutes. Next time I think I'll use a basil-arugula mix, and mix it in with the vegetables instead of just having it underneath.  Or use this as topping for crostini - a piece of toasted bread, topped with a basil leaf and the mushroom/pepper/chick peas on top of that.

7.28.2011

The Whole Beet


What a coincidence - right after reading Julia Moskin's article about using the whole plant while cooking, and Tom Laskawy's article on stem-to-root cooking, our garden beets were ready to harvest.  I've cooked beets before, but usually I buy them loose, with their leaves and stems already trimmed.  This is the first year that the beet plants in our garden actually grew, and I was taken by the gorgeous green and purple leaves.


 I looked for a recipe that would use both the beets and the beet leaves, and found one from allrecipes.com, for Roasted Beets and Sauteed Beet Greens

1 bunch beets with greens
1/4 cup olive oil, divided
2 cloves garlic, minced
2 tablespoons chopped onion

1) First, I washed the beets. This is probably the most time consuming part, and why it's tempting to just buy loose beets, or even easier, buy the ones that come already cooked and peeled in the package.  But, the point here was to use the entire, natural plant, so I soaked the whole plant (beets & leaves) in a tub of water, changing the water several times, until all the dirt was off.

2) I cut off the greens, and placed just the beets in a baking dish. I used both golden and red beets. If you use two colors, separate them into two dishes, or with a piece of foil so the red ones don't bleed on the golden ones. Brush them with 2 tablespoons olive oil, cover and bake at 350 degrees for 45 minutes. They're done when you can pierce them easily (like testing a baked potato).


3. When they're done, let them cool until you can handle them. Now's the fun part - peeling them. The skins come off easily with a peeler or paring knife. Your fingers will turn purple but it'll wash off.

4. Now for the greens.  The entire green part is edible, but the ribs and stems are tougher and take longer to cook, so I ripped the leaves off the stems, and saved the stems for another recipe. That left me with a nice pile of pretty leaves, ripped into small pieces.


5. To cook the greens, heat 2 tablespoons oil in a skillet, and sautee the chopped garlic and onion. I used onion from my garden, so I saved the green stems to cook with the beet leaves (use the whole plant!).  Add the greens and cook while stirring, until the greens are wilted. 

The original recipe called for salt and pepper, and red wine vinegar, but I didn't add these - the beets and leaves were flavorful enough.  I served the roasted beets on a bed of the greens, along with a carribean black bean dish and quinoa. The beet leaves weren't as sweet as spinach, but not as bitter as collards.  

The most amazing part of this was realizing that this dish cost almost nothing to make - basically just the cost of the seed packet.  If I had gone out to buy the ingredients, I could have easily spent $3 on a pack of cooked peeled beets, and another $3 on a bag of salad greens.  Pretty cool that this substantial side dish came from just a handful of cheap seeds.

5.31.2011

Persian Salad with Olives and Pomegranate


I've got an end-of-year work potluck tomorrow, so I made one of my favorite potluck dishes. I adapted the recipe from the recipe for "Shirazi Cucumber &  Pomegranate Salad" in Silk Road Cooking: A Vegetarian Journey by Najmieh Batmanglij.  This is an AMAZING cookbook - full of Persian recipes plus recipes from everywhere in Asia from the Mediterranean to the Pacific. So many cookbooks just focus on the Middle East or India/Pakistan, but this one has some really unique recipes from Iran and nearby countries in Central Asia too.

The original recipe is a salad of cucumbers, onions, olives, and pomegranate seeds, with a dressing that has a pomegranate base.  The key taste here is the contrast between the olives and pomegranates, but I didn't want to put off anyone who was unfamiliar with the texture of pomegranate seeds or was turned off by pieces of raw onion.  So, I left out the onions and pomegranate seeds, and added chopped tomatoes, making it look a little bit more like the more familiar Jerusalem Salad that's typical to Middle Eastern cooking.  And I added chickpeas to upgrade it to entree salad level.

Persian Salad with Olives and Pomegranate 

Salad:

2 cucumbers
3 medium tomatoes
1-1/2 cups pitted green olives
1-1/2 cups cooked or canned chick peas

Dressing:

2 cloves garlic, peeled
1 tbsp. pomegranate concentrate
1 tbsp. lime juice
1 tbsp. honey
1 tsp. salt
1/2 tsp. black pepper
1/4 tsp. red pepper flakes
1/2 cup olive oil

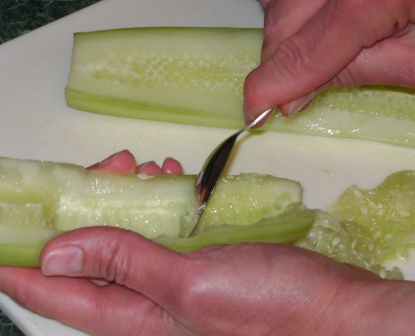
1) Peel the cucumbers, then scoop the seeds out of the cucumbers & tomatoes.  Scooping the seeds out is easy - just cut the cucumber lengthwise and scrape them out with a spoon. Cut the tomato across the center and do the same thing.


Or you could just buy seedless cucumbers and save a step.

2) Mix together the cucumbers, tomatoes, olives, and chick peas.  I don't like the taste of canned olives, so I bought the Taamti brand, which is refrigerated.  I've also used Kvuzat Yavne brand, which comes in jars - both are Israeli brands and kosher, and best of all, they're already pitted.  I cut the olives in half.


3) Now for the dressing - the key ingredient in this dressing is Pomegranate Concentrate, which is just what it sounds like - a concentrated pomegranate juice. It's sold in Middle Eastern groceries, or you could make your own by simmering pomegranate juice to make a thick reduction.  The brand I used is Sadaf, which has a nice sweet taste, and is also kosher.  Other brands that sell this are Ziyad and Sultan.


The original recipe called for sesame oil, but I left that out this time - it does add a more complex taste combo, but I wanted the tang of the dressing to really shine. I also increased the amount of honey and garlic, two ingredients you can't have too much of.

I love juicing limes (and lemons) - gives me an excuse to use this little gadget whose name I can't remember.  Gets the smell of the garlic cloves off my hands too.


4) Blend all the ingredients together - a blender gives the best consistency, but you can use a whisk (just crush or mince the garlic first).  I used my Magic Bullet, which is my favorite electronic gadget that I initially made fun of my husband for buying after he saw the infomercial. 


5) Mix the dressing through with the salad.  It's a good idea to make it a day ahead so the flavors can meld while it's sitting in the fridge.


6) You can eat the salad on it's own, or on a bed of greens - arugula's peppery taste compliments it nicely.